Portables, case replacements, mods etc, all in here!
-
Ashen
- Posts: 994
- Joined: Tue Nov 16, 2010 3:08 pm
Post
by Ashen » Sun May 12, 2013 6:15 am
-
megalomaniac
- Posts: 2480
- Joined: Sun Aug 21, 2011 5:33 am
- Location: Drunk in Texas
-
Contact:
Post
by megalomaniac » Sun May 12, 2013 6:35 am
plan on using an old school gameboy power switch at the top corner??
-
HomelandReloaded
Post
by HomelandReloaded » Sun May 12, 2013 9:32 am
So the vents are on the sides near the screen, and the feet prevent the console from being placed flat on a table, obstructing the fan?
EDIT: I would put the feet near the top of the case, so that the console is tilted toward the player when placed on a flat surface.
-
MockyLock
- Posts: 330
- Joined: Tue Aug 07, 2012 8:12 pm
- Location: France
Post
by MockyLock » Sun May 12, 2013 11:53 am
HomelandReloaded wrote:So the vents are on the sides near the screen, and the feet prevent the console from being placed flat on a table, obstructing the fan?
EDIT: I would put the feet near the top of the case, so that the console is tilted toward the player when placed on a flat surface.
I think they are here for L-R trigger too.
-
Ashen
- Posts: 994
- Joined: Tue Nov 16, 2010 3:08 pm
Post
by Ashen » Sun May 12, 2013 3:51 pm
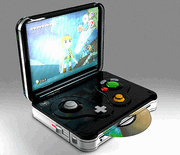
They are not really feet, they are for the shoulder/z buttons. You can see better here that the vents are on the sides. The fan sucks hot air over the heatsink and blows it upward, so it'll never be blocked, even if its laying down. With the fan mounted on the back it lays pretty flat.

Sorry Mega, no true DMG parts are used here. :/
-
MockyLock
- Posts: 330
- Joined: Tue Aug 07, 2012 8:12 pm
- Location: France
Post
by MockyLock » Sun May 12, 2013 7:22 pm
I'm really amazed about how your case looking professionnal made.
-
emu_kidid
- Site Admin
- Posts: 4951
- Joined: Mon Mar 29, 2010 10:06 am
- Location: Australia
-
Contact:
Post
by emu_kidid » Sun May 12, 2013 10:32 pm
very nice. also just caught up with your "PS2 thing", which looks amazing btw

-
HomelandReloaded
Post
by HomelandReloaded » Sun May 12, 2013 11:49 pm
MockyLock wrote:I'm really amazed about how your case looking professionnal made.
Yes, I agree. The smooth matt finish, the GC logo, and even the controller buttons. (btw I think the controller stick has 8 positions, so ideally would have 4 more arrows around it.) It looks solid too.
-
Ashen
- Posts: 994
- Joined: Tue Nov 16, 2010 3:08 pm
Post
by Ashen » Mon May 13, 2013 12:23 am
Thanks guys!
Ahhh, yes. My "PS2 Thing" thats been done for months. But I've been to lazy to make a proper finished video/post for... Hehe...
There's not much I can do about how the directional pad looks on the controller portion of this one. I frankencased in the front panels from an intec controller. So it is what it is:

-
SNEAKxxATTACK
- Posts: 23
- Joined: Fri Mar 15, 2013 4:46 pm
Post
by SNEAKxxATTACK » Mon May 13, 2013 12:37 am
MockyLock wrote:I'm really amazed about how your case looking professionnal made.
I'm not amazed, it's expected of ashen. I'm just in the stage of jealousy now.
-
MockyLock
- Posts: 330
- Joined: Tue Aug 07, 2012 8:12 pm
- Location: France
Post
by MockyLock » Mon May 13, 2013 6:05 am
SNEAKxxATTACK wrote:MockyLock wrote:I'm really amazed about how your case looking professionnal made.
I'm not amazed, it's expected of ashen. I'm just in the stage of jealousy now.
Since i'm pretty new here, i'm still in first stage of amazing

-
andzlay
- Posts: 451
- Joined: Thu Jul 08, 2010 12:53 am
- Location: Germany
Post
by andzlay » Mon May 13, 2013 6:32 am
neat! How did you make the case?
-
andzlay
- Posts: 451
- Joined: Thu Jul 08, 2010 12:53 am
- Location: Germany
Post
by andzlay » Tue May 14, 2013 6:53 am
Haha "Tired of buying cheap plastic crap?" ... "Now you can make your own"

Looks cool and what did you use as a model? I guess this is way cheaper than 3D-printing, isn't it?
-
Ashen
- Posts: 994
- Joined: Tue Nov 16, 2010 3:08 pm
Post
by Ashen » Tue May 14, 2013 8:25 pm
I make my molds out of bricks of either MDF particle board or thick bricks of polyethylene plastic. Vac forming is way cheaper than purchasing a 3d printer for sure. I build my setup for like $10. All you have to do after is buy the plastic sheet.
Final Stretch!

-
emu_kidid
- Site Admin
- Posts: 4951
- Joined: Mon Mar 29, 2010 10:06 am
- Location: Australia
-
Contact:
Post
by emu_kidid » Tue May 14, 2013 10:26 pm
wow, very nice Ashen.
Random question, do you use tactile switches for the controller buttons, if so, which ones? On my portable that you made (way back when), was that using cut up controller pcb? have you found that tactile switches are better?
-
Ashen
- Posts: 994
- Joined: Tue Nov 16, 2010 3:08 pm
Post
by Ashen » Wed May 15, 2013 1:25 am
This is actually the first portable I've used "tact switches" for all of the buttons. I put the quotes around tact switches becuase I didn't use normal "clicky tacts" I used these:

Normally I use cut up parts of the controller boards with the original membranes attached for most of the buttons. Honestly, I prefer this method. As it gives a much more authentic feel while playing. The only issue with using this method is mounting the damn things in the case, usually I resort to just putting mounds of epoxy around the entire cut portion of the controller and casing to hold them in. Not really the best solution, but hey, it works.
The "tacts" I linked to above give a similar feel to original controller parts, but I can still tell the difference.
-
SNEAKxxATTACK
- Posts: 23
- Joined: Fri Mar 15, 2013 4:46 pm
Post
by SNEAKxxATTACK » Wed May 15, 2013 1:35 am
We need to measure the force applied to click the membrane switches. Or just test.
Then find those soft tact switches that match the specification we need.
Digikey has tact switches and they show the force required to close the switch, which is why I mention this.
-
emu_kidid
- Site Admin
- Posts: 4951
- Joined: Mon Mar 29, 2010 10:06 am
- Location: Australia
-
Contact:
Post
by emu_kidid » Wed May 15, 2013 1:38 am
those look pretty nice, but I think I'll go with cut up controller when I get around to doing mine. thanks for the info
-
liquitt
- Posts: 1814
- Joined: Thu Apr 01, 2010 5:43 am
- Location: neverland
Post
by liquitt » Wed May 15, 2013 8:14 pm
wow that one came out pretty damn small! good work as always! thumbs up
please search before you ask - a lot has been discussed already!
(or use google with "site:gc-forever.com *term*")
http://is.gd/MDmZcr
we also have a wiki filled with knowledge
http://is.gd/dX58Rm
-
Ashen
- Posts: 994
- Joined: Tue Nov 16, 2010 3:08 pm
Post
by Ashen » Wed May 29, 2013 6:07 pm
-
Duhasst0
- Posts: 179
- Joined: Sun Jan 13, 2013 1:35 am
Post
by Duhasst0 » Wed May 29, 2013 6:17 pm
I really love it dude. Awesome work.
-
emu_kidid
- Site Admin
- Posts: 4951
- Joined: Mon Mar 29, 2010 10:06 am
- Location: Australia
-
Contact:
Post
by emu_kidid » Wed May 29, 2013 10:35 pm
Introduced yourself as AshenSlayer? Didn't know you guys merged into one entity now?

Yet another awesome GCp.
I ordered a case from cndcustomgaming but it's a bit "thin", do I need to add some plexi inside to make it more durable, what do you use?
-
Ashen
- Posts: 994
- Joined: Tue Nov 16, 2010 3:08 pm
Post
by Ashen » Thu May 30, 2013 5:11 am
Thanks guys! Haha, Emu. The AshenSlayer thing is kind of a running joke now from our meetup at Downing's. It was pretty much summed up that my video's are/were kind of bland/boring and that I needed to spice it up a bit. So yea.. lol. If you saw the finished vid from my PS2p I started my video out how SS always starts his.
Adding stuff inside to make it more durable depends on how the case is made. I'm assuming its something Downing vac formed and CNC'd? If it has a full vac formed back and front you can just do like I do and cut some 3/8-1/2" wide strips of lexan/polycarbonate and superglue them to the inside so the case halves meet up perfectly, you can kind of see how I do this in some of the photo's above, but if you need I can elaborate too.